How to Fix a Treadmill
To fix a treadmill, first unplug it and inspect for visible issues like loose belts or worn motor brushes. Check the safety key and power source if it won’t start. Adjust belt tension and apply silicone lubricant to stop slipping or squeaking.
For display issues, reset the console and inspect wiring connections. Replace motors by matching specifications carefully. Regularly clean and maintain components to prevent failures.
Keep following to uncover detailed repair and maintenance steps.
Key Takeaways
- Unplug the treadmill and inspect for visible damage, loose parts, or worn belts before starting repairs.
- Check power supply, safety key, and motor brushes if the treadmill won’t start or the motor hums.
- Adjust belt tension and apply silicone-based lubricant to fix slipping or squeaking sounds.
- Inspect and reset the console by unplugging for 5 minutes, checking wiring, and replacing faulty display components.
- Perform regular maintenance including cleaning, tightening bolts, lubricating, and inspecting electrical connections for longevity.
Identify Common Treadmill Problems
Before you start repairing your treadmill, you need to identify the most common problems it may have. One frequent issue is excessive treadmill noise, often caused by worn belts, loose components, or inadequate lubrication.
Identifying common treadmill issues like noise from worn belts or loose parts is essential before repairs.
Check the belt alignment and tension first, as these directly influence noise and performance.
Another typical problem is a malfunctioning motor or display panel, which interrupts normal operation.
Regularly following a maintenance schedule helps prevent these issues and extends your treadmill’s lifespan. Inspect moving parts and electronics systematically according to the manufacturer’s guidelines.
By pinpointing specific symptoms like unusual sounds or performance drops, you can focus your repairs effectively.
Understanding these common faults streamlines your troubleshooting process and guarantees you apply precise fixes without unnecessary replacements or downtime.
Safety Tips and Initial Treadmill Inspection
Before you start any repairs, guarantee you unplug the treadmill to avoid electrical hazards.
Carefully examine the treadmill’s frame, belt, and console for visible damage or wear.
Then, inspect the power cord and plug for fraying or exposed wires to confirm the equipment is safe to operate.
Essential Safety Precautions
Although fixing a treadmill may seem straightforward, you must follow essential safety precautions to prevent injury and equipment damage.
First, disconnect the treadmill from its power source before starting any repair work to eliminate electric shock risks.
Familiarize yourself with treadmill safety by reviewing the manufacturer’s manual and understanding emergency procedures, such as how to quickly stop the machine using the safety key or emergency stop button.
Wear appropriate personal protective equipment, like gloves and safety glasses, to protect against mechanical hazards.
Confirm your work area is clean and well-lit. Avoid wearing loose clothing or jewelry that could get caught in moving parts.
Visual Equipment Examination
A thorough visual examination of your treadmill is essential to identify obvious issues that could affect performance or safety.
Begin by inspecting the running belt for tears, fraying, or uneven wear. Check the deck underneath for cracks or damage.
Examine the frame for loose bolts, rust, or structural deformities. Look closely at the rollers and verify they’re free of debris and spin smoothly.
Assess the console and control buttons for any visible damage or missing parts.
This visual inspection helps you pinpoint areas needing immediate equipment maintenance, preventing further damage or injury.
Make certain the treadmill is unplugged during this process to avoid accidental startups. Document any findings for reference before proceeding to more detailed diagnostics.
Power and Cord Check
Start by inspecting the treadmill’s power cord and plug for any signs of wear, cracks, or exposed wires. Addressing power issues early prevents electrical hazards and equipment damage.
Follow these steps carefully:
- Unplug the treadmill before examination to avoid electric shock.
- Check the cord’s insulation integrity; frayed or brittle cords require immediate cord replacement.
- Examine the plug prongs for corrosion or bending, which can cause intermittent power loss.
If you detect damage, replace the cord with a manufacturer-recommended part to guarantee compatibility and safety.
Additionally, test the outlet with another device to rule out external power issues. Properly maintaining the power cord and plug guarantees reliable treadmill operation and reduces the risk of electrical failure during use.
Fix Your Treadmill When It Won’t Start
Three common reasons prevent your treadmill from starting: power issues, safety key problems, and motor malfunctions.
First, verify the treadmill is plugged into a functioning outlet; check the circuit breaker hasn’t tripped.
Next, check the safety key. Without it properly inserted, the treadmill won’t start. Confirm the key aligns with the console slot per treadmill safety protocols.
If power and safety key are intact, inspect the motor. Use troubleshooting techniques like listening for humming sounds or checking motor brushes for wear.
If the motor fails to engage, the control board or wiring may need testing with a multimeter.
Always disconnect power before opening the motor cover.
Troubleshoot Treadmill Belt Slipping and Squeaking
If your treadmill belt is slipping or squeaking, start by checking and adjusting the belt tension to guarantee proper grip.
Next, apply a suitable lubricant to the belt surface to reduce friction and noise.
These steps will help restore smooth and quiet treadmill operation.
Adjust Belt Tension
A properly adjusted treadmill belt guarantees smooth operation and prevents slipping or squeaking during use. To adjust belt tension correctly, first check the belt alignment to confirm it runs centered on the deck. Misalignment can cause uneven wear and noise.
Next, perform tension adjustment by tightening the rear roller bolts incrementally, usually a quarter turn at a time, until the belt feels firm but not overly tight. Over-tightening can strain the motor.
Key steps include:
- Loosen the rear roller bolts slightly before adjusting tension.
- Use a hex wrench to turn the adjustment bolts evenly on both sides.
- Test the belt by lifting it; it should rise about 2–3 inches with moderate pressure.
Consistently monitor belt alignment after tension changes to maintain peak performance.
Lubricate Belt Surface
Proper lubrication of the treadmill belt surface reduces friction, preventing slipping and squeaking during operation.
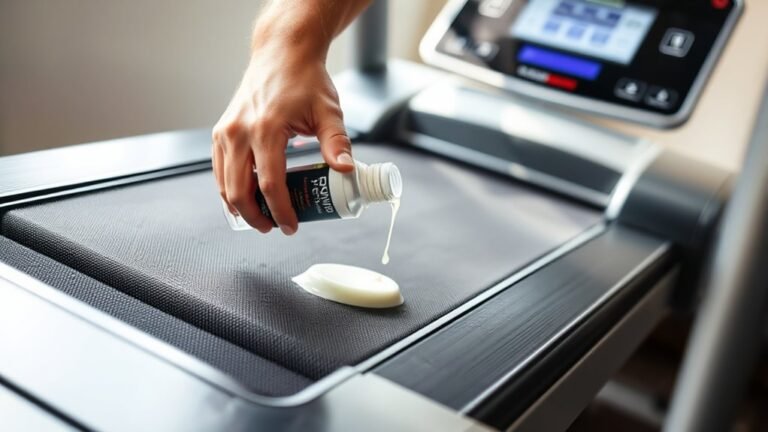
To perform effective belt maintenance, first identify the correct lubricant type recommended by your treadmill manufacturer. Typically, silicone-based lubricants are preferred for their durability and compatibility.
Begin by unplugging the machine and loosening the belt tension slightly. Lift the belt carefully and apply a thin, even layer of lubricant beneath the belt on the deck surface. Avoid over-lubricating, as excess lubricant can attract dust and cause mess.
Once applied, tighten the belt to the proper tension and run the treadmill at a low speed for several minutes to distribute the lubricant evenly.
Regular lubrication intervals vary, but applying lubricant every three to six months guarantees peak performance and longevity.
Adjust and Lubricate Your Treadmill Belt for Smooth Operation
Although your treadmill may seem to run smoothly, adjusting and lubricating the belt regularly guarantees peak performance and extends its lifespan. To prevent excessive belt wear, follow your treadmill’s maintenance schedule strictly.
Begin by unplugging the machine for safety. Then, adjust the belt tension and alignment using the rear roller bolts to make certain it runs centered without slipping. Next, apply a silicone-based lubricant beneath the belt to reduce friction and heat buildup.
Key steps include:
- Check belt tension: too tight causes wear, too loose causes slipping
- Center the belt: realign if it drifts to one side during operation
- Lubricate under the belt: apply lubricant evenly to avoid dry spots
Perform these tasks every 3-6 months, depending on usage frequency, to maintain smooth operation.
Replace a Broken Treadmill Motor
Replacing a broken treadmill motor requires careful diagnosis and the right tools to guarantee safe and effective installation. First, confirm the motor’s failure by testing for electrical continuity and unusual noises.
Next, ascertain motor compatibility by matching the replacement motor’s voltage, horsepower, and mounting configuration with your treadmill’s specifications. Disconnect the treadmill from power, remove the motor cover, and carefully disconnect wiring harnesses.
Follow the replacement process by unbolting the motor from its bracket and removing it. Install the new motor by securing it firmly in place and reconnecting all wiring according to the manufacturer’s schematic.
Finally, test the treadmill at low speed to verify proper operation before fully reassembling. Proper adherence to motor compatibility and replacement process steps guarantees a durable repair.
Fix Common Treadmill Display and Console Problems
When your treadmill’s display or console malfunctions, you won’t be able to track your workout metrics or control settings effectively.
To fix common display issues and console malfunctions, start by performing a thorough visual inspection. Check for loose connections or damaged cables behind the console.
Next, reset the treadmill by unplugging it for 5 minutes to clear any temporary errors. If the problem persists, test the console’s fuse or circuit board for faults.
Address these key areas:
Inspect and reseat all wiring harnesses and connectors.
Replace faulty display panels or buttons showing no response.
Update or reinstall firmware if your treadmill supports software updates.
Maintain Your Treadmill to Prevent Future Breakdowns
After addressing display and console issues, focus on maintaining your treadmill regularly to reduce the risk of future breakdowns.
Start with treadmill cleaning: wipe down the belt, deck, and motor cover to remove dust and debris that can impair function.
Use a vacuum or compressed air to clear dust from vents and motor housing.
Perform a regular inspection every month. Check belt alignment, tension, and wear; tighten loose bolts; and inspect electrical connections for corrosion or damage.
Lubricate the belt and deck according to the manufacturer’s recommendations to minimize friction and wear.
Consistent treadmill cleaning and regular inspection guarantee smooth operation and extend your machine’s lifespan.
When to Call a Professional for Treadmill Repairs
Although routine maintenance can resolve many issues, certain problems require professional expertise to secure safety and proper repair.
You should contact professional services when you encounter complex mechanical failures or electrical malfunctions beyond basic troubleshooting.
Additionally, if your treadmill is still under treadmill warranties, calling a certified technician guarantees you don’t void your coverage.
Consider calling a professional if you notice:
- Persistent motor or belt issues despite standard adjustments
- Faulty electronic display or control panel malfunctions
- Unusual noises indicating internal component wear or damage
Frequently Asked Questions
Can I Use My Treadmill Outside in Rainy Weather?
You shouldn’t use your treadmill outside in rainy weather. Moisture damages electrical components and belts.
For proper treadmill maintenance, restrict outdoor usage to dry conditions, and always cover or store it indoors to prevent corrosion and malfunction.
How Do I Safely Dispose of Old Treadmill Parts?
Don’t worry about complexity; you can safely dispose of old treadmill parts by checking local recycling options. Separate hazardous materials like batteries and electronics, and take them to designated facilities to guarantee proper handling and environmental safety.
What Are the Best Treadmill Workouts for Weight Loss?
You should focus on treadmill intervals and incline workouts to maximize weight loss. Alternate high-intensity sprints with recovery periods, and adjust the incline to increase resistance, boosting calorie burn and improving cardiovascular fitness efficiently.
Are Treadmill Warranties Transferable Between Owners?
You generally can’t transfer treadmill warranties between owners, as most manufacturers restrict warranty transfer due to ownership policies.
Always review your treadmill’s specific warranty transfer terms before selling or buying used equipment to avoid coverage issues.
Can I Connect My Treadmill to Fitness Tracking Apps?
You can connect your treadmill to fitness tracking apps if it supports Bluetooth or Wi-Fi. Approximately 70% of modern treadmills offer app synchronization.
Check your treadmill compatibility in the manual, then enable device pairing for accurate tracking.
Conclusion
Now that you’ve identified common issues and learned how to inspect, adjust, and repair key treadmill components, you can keep your machine running smoothly. Remember, regular maintenance like lubrication and belt alignment prevents most problems.
If your treadmill won’t start or the motor fails, troubleshoot carefully before replacing parts. When problems persist beyond your skill level, don’t hesitate to call a professional.
Consistent care guarantees your treadmill’s reliability and extends its lifespan. Following these steps will help you effectively fix a treadmill and enjoy uninterrupted workouts.